안녕하세요. 파이토치로 SENet을 구현하고 학습해보도록 하겠습니다.
SENet은 SEBlock을 제안한 신경망입니다. SEBlock은 피쳐맵의 채널별 가중치를 계산하고, 이 가중치를 residual unit의 출력 피쳐맵에 곱해줍니다. 이 방법으로 모델의 성능을 개선할 수 있었습니다. SEBlock의 장점은 CNN 구조라면 어떤 모델이든지 사용할 수 있다는 점입니다. resnet, mobilenet, efficientnet 등등 여러 모델에 부착하여 사용할 수 있습니다.
자세한 논문 리뷰는 아래 포스팅에서 확인하실 수 있습니다.
[논문 읽기] SENet(2018) 리뷰, Squeeze-and-Excitation Networks
이번에 읽어볼 논문은 SENet, Squeeze-and-Excitation Networks 입니다. SENet은 ILSVRC 2017에서 1등을 한 모델입니다. SENet은 채널간의 상호작용에 집중하여 성능을 끌어올린 모델입니다. 채널 간의 상..
deep-learning-study.tistory.com
전체 코드는 여기에서 확인하실 수 있습니다.
1. 데이터 셋 불러오기
데이터셋은 torchvision 패키지에서 제공하는 STL10 dataset을 이용하겠습니다. STL10 dataset은 10개의 label을 갖으며 train dataset 5000개, test dataset 8000개로 구성됩니다.
데이터셋을 불러오기 전에, 라이브러리를 import 합니다.
# import package

# model
import torch
import torch.nn as nn
import torch.nn.functional as F
from torchsummary import summary
from torch import optim

# dataset and transformation
from torchvision import datasets
import torchvision.transforms as transforms
from torch.utils.data import DataLoader
import os

# display images
from torchvision import utils
import matplotlib.pyplot as plt
%matplotlib inline

# utils
import numpy as np
from torchsummary import summary
import time
import copy
데이터셋을 불러옵니다.
# specify path to data
path2data = '/content/senet/MyDrive/data'

# if not exists the path, make the directory
if not os.path.exists(path2data):
    os.mkdir(path2data)

# load dataset
train_ds = datasets.STL10(path2data, split='train', download=True, transform=transforms.ToTensor())
val_ds = datasets.STL10(path2data, split='test', download=True, transform=transforms.ToTensor())

print(len(train_ds))
print(len(val_ds))
transformation을 정의하고, dataset에 적용합니다.
# define transformation
transformation = transforms.Compose([
                    transforms.ToTensor(),
                    transforms.Resize(224)
])

# apply transformation to dataset
train_ds.transform = transformation
val_ds.transform = transformation
dataloader를 생성합니다.
# make dataloade
train_dl = DataLoader(train_ds, batch_size=32, shuffle=True)
val_dl = DataLoader(val_ds, batch_size=32, shuffle=True)
샘플 이미지를 확인합니다.
# check sample images
def show(img, y=None):
    npimg = img.numpy()
    npimg_tr = np.transpose(npimg, (1, 2, 0))
    plt.imshow(npimg_tr)

    if y is not None:
        plt.title('labels:' + str(y))

np.random.seed(13)
torch.manual_seed(0)

grid_size=4
rnd_ind = np.random.randint(0, len(train_ds), grid_size)

x_grid = [train_ds[i][0] for i in rnd_ind]
y_grid = [val_ds[i][1] for i in rnd_ind]

x_grid = utils.make_grid(x_grid, nrow=grid_size, padding=2)
plt.figure(figsize=(10,10))
show(x_grid, y_grid)
2. 모델 구축하기
MobileNetV1에 SEBlock을 적용하겠습니다.

SEBlock은 squeeze와 excitation 과정을 거쳐서 1x1xC 벡터를 생성합니다. 그리고 피쳐맵에 곱합니다.
SEBlock의 세부 구조입니다.

class SEBlock(nn.Module):
    def __init__(self, in_channels, r=16):
        super().__init__()
        self.squeeze = nn.AdaptiveAvgPool2d((1,1))
        self.excitation = nn.Sequential(
            nn.Linear(in_channels, in_channels // r),
            nn.ReLU(),
            nn.Linear(in_channels // r, in_channels),
            nn.Sigmoid()
        )

    def forward(self, x):
        x = self.squeeze(x)
        x = x.view(x.size(0), -1)
        x = self.excitation(x)
        x = x.view(x.size(0), x.size(1), 1, 1)
        return x
SEBlock 클래스를 생성했으므로, MobileNetV1 모델을 구축한 뒤에 적용하겠습니다.
# Depthwise Separable Convolution
class Depthwise(nn.Module):
    def __init__(self, in_channels, out_channels, stride=1):
        super().__init__()

        self.depthwise = nn.Sequential(
            nn.Conv2d(in_channels, in_channels, 3, stride=stride, padding=1, groups=in_channels, bias=False),
            nn.BatchNorm2d(in_channels),
            nn.ReLU6(),
        )

        self.pointwise = nn.Sequential(
            nn.Conv2d(in_channels, out_channels, 1, stride=1, padding=0, bias=False),
            nn.BatchNorm2d(out_channels),
            nn.ReLU6(),
        )

        self.seblock = SEBlock(out_channels)

    def forward(self, x):
        x = self.depthwise(x)
        x = self.pointwise(x)
        x = self.seblock(x) * x
        return x


# BasicConv2d
class BasicConv2d(nn.Module):
    def __init__(self, in_channels, out_channels, kernel_size, **kwargs):
        super().__init__()

        self.conv = nn.Sequential(
            nn.Conv2d(in_channels, out_channels, kernel_size=kernel_size, **kwargs),
            nn.BatchNorm2d(out_channels),
            nn.ReLU6()
        )

    def forward(self, x):
        x = self.conv(x)
        return x


# MobileNetV1
class MobileNet(nn.Module):
    def __init__(self, width_multiplier, num_classes=10, init_weights=True):
        super().__init__()
        self.init_weights=init_weights
        alpha = width_multiplier

        self.conv1 = BasicConv2d(3, int(32*alpha), 3, stride=2, padding=1)
        self.conv2 = Depthwise(int(32*alpha), int(64*alpha), stride=1)
        # down sample
        self.conv3 = nn.Sequential(
            Depthwise(int(64*alpha), int(128*alpha), stride=2),
            Depthwise(int(128*alpha), int(128*alpha), stride=1)
        )
        # down sample
        self.conv4 = nn.Sequential(
            Depthwise(int(128*alpha), int(256*alpha), stride=2),
            Depthwise(int(256*alpha), int(256*alpha), stride=1)
        )
        # down sample
        self.conv5 = nn.Sequential(
            Depthwise(int(256*alpha), int(512*alpha), stride=2),
            Depthwise(int(512*alpha), int(512*alpha), stride=1),
            Depthwise(int(512*alpha), int(512*alpha), stride=1),
            Depthwise(int(512*alpha), int(512*alpha), stride=1),
            Depthwise(int(512*alpha), int(512*alpha), stride=1),
            Depthwise(int(512*alpha), int(512*alpha), stride=1),
        )
        # down sample
        self.conv6 = nn.Sequential(
            Depthwise(int(512*alpha), int(1024*alpha), stride=2)
        )
        # down sample
        self.conv7 = nn.Sequential(
            Depthwise(int(1024*alpha), int(1024*alpha), stride=2)
        )

        self.avg_pool = nn.AdaptiveAvgPool2d((1,1))
        self.linear = nn.Linear(int(1024*alpha), num_classes)

        # weights initialization
        if self.init_weights:
            self._initialize_weights()

    def forward(self, x):
        x = self.conv1(x)
        x = self.conv2(x)
        x = self.conv3(x)
        x = self.conv4(x)
        x = self.conv5(x)
        x = self.conv6(x)
        x = self.conv7(x)
        x = self.avg_pool(x)
        x = x.view(x.size(0), -1)
        x = self.linear(x)
        return x

    # weights initialization function
    def _initialize_weights(self):
        for m in self.modules():
            if isinstance(m, nn.Conv2d):
                nn.init.kaiming_normal_(m.weight, mode='fan_out', nonlinearity='relu')
                if m.bias is not None:
                    nn.init.constant_(m.bias, 0)
            elif isinstance(m, nn.BatchNorm2d):
                nn.init.constant_(m.weight, 1)
                nn.init.constant_(m.bias, 0)
            elif isinstance(m, nn.Linear):
                nn.init.normal_(m.weight, 0, 0.01)
                nn.init.constant_(m.bias, 0)

def mobilenet(alpha=1, num_classes=10):
    return MobileNet(alpha, num_classes)
구축한 모델이 작동하는지 확인합니다.
# check MobileNetV1
device = torch.device('cuda' if torch.cuda.is_available() else 'cpu')
x = torch.randn(3, 3, 224, 224).to(device)
model = mobilenet().to(device)
output = model(x)
print(output.size())
summary를 출력합니다.
# print model summary
summary(model, (3, 224, 224), device=device.type)
3. 학습하기
학습에 필요한 함수를 정의하고, 학습을 하겠습니다.
# define loss function, optimizer, lr_scheduler
loss_func = nn.CrossEntropyLoss(reduction='sum')
opt = optim.Adam(model.parameters(), lr=0.01)

from torch.optim.lr_scheduler import ReduceLROnPlateau
lr_scheduler = ReduceLROnPlateau(opt, mode='min', factor=0.1, patience=10)


# get current lr
def get_lr(opt):
    for param_group in opt.param_groups:
        return param_group['lr']


# calculate the metric per mini-batch
def metric_batch(output, target):
    pred = output.argmax(1, keepdim=True)
    corrects = pred.eq(target.view_as(pred)).sum().item()
    return corrects


# calculate the loss per mini-batch
def loss_batch(loss_func, output, target, opt=None):
    loss_b = loss_func(output, target)
    metric_b = metric_batch(output, target)

    if opt is not None:
        opt.zero_grad()
        loss_b.backward()
        opt.step()

    return loss_b.item(), metric_b


# calculate the loss per epochs
def loss_epoch(model, loss_func, dataset_dl, sanity_check=False, opt=None):
    running_loss = 0.0
    running_metric = 0.0
    len_data = len(dataset_dl.dataset)

    for xb, yb in dataset_dl:
        xb = xb.to(device)
        yb = yb.to(device)
        output = model(xb)

        loss_b, metric_b = loss_batch(loss_func, output, yb, opt)

        running_loss += loss_b

        if metric_b is not None:
            running_metric += metric_b

        if sanity_check is True:
            break

    loss = running_loss / len_data
    metric = running_metric / len_data
    return loss, metric


# function to start training
def train_val(model, params):
    num_epochs=params['num_epochs']
    loss_func=params['loss_func']
    opt=params['optimizer']
    train_dl=params['train_dl']
    val_dl=params['val_dl']
    sanity_check=params['sanity_check']
    lr_scheduler=params['lr_scheduler']
    path2weights=params['path2weights']

    loss_history = {'train': [], 'val': []}
    metric_history = {'train': [], 'val': []}

    best_loss = float('inf')
    best_model_wts = copy.deepcopy(model.state_dict())
    start_time = time.time()

    for epoch in range(num_epochs):
        current_lr = get_lr(opt)
        print('Epoch {}/{}, current lr= {}'.format(epoch, num_epochs-1, current_lr))

        model.train()
        train_loss, train_metric = loss_epoch(model, loss_func, train_dl, sanity_check, opt)
        loss_history['train'].append(train_loss)
        metric_history['train'].append(train_metric)

        model.eval()
        with torch.no_grad():
            val_loss, val_metric = loss_epoch(model, loss_func, val_dl, sanity_check)
        loss_history['val'].append(val_loss)
        metric_history['val'].append(val_metric)

        if val_loss < best_loss:
            best_loss = val_loss
            best_model_wts = copy.deepcopy(model.state_dict())
            torch.save(model.state_dict(), path2weights)
            print('Copied best model weights!')

        lr_scheduler.step(val_loss)
        if current_lr != get_lr(opt):
            print('Loading best model weights!')
            model.load_state_dict(best_model_wts)

        print('train loss: %.6f, val loss: %.6f, accuracy: %.2f, time: %.4f min' %(train_loss, val_loss, 100*val_metric, (time.time()-start_time)/60))
        print('-'*10)

    model.load_state_dict(best_model_wts)
    return model, loss_history, metric_history
# define the training parameters
params_train = {
    'num_epochs':100,
    'optimizer':opt,
    'loss_func':loss_func,
    'train_dl':train_dl,
    'val_dl':val_dl,
    'sanity_check':False,
    'lr_scheduler':lr_scheduler,
    'path2weights':'./models/weights.pt',
}

# check the directory to save weights.pt
def createFolder(directory):
    try:
        if not os.path.exists(directory):
            os.makedirs(directory)
    except OSerror:
        print('Error')
createFolder('./models')
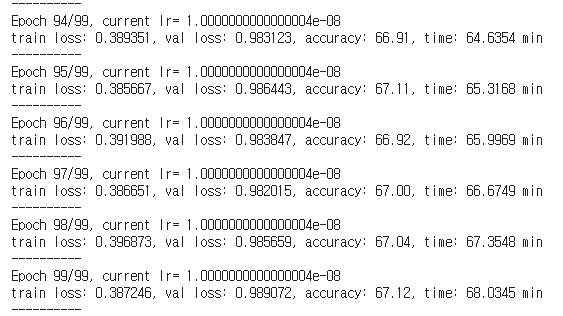
100 epoch 학습하겠습니다.
model, loss_hist, metric_hist = train_val(model, params_train)

learning rate scheduler를 cosin annealing을 사용하면 성능이 더 잘나올것 같네요. 모델 구현이 목적이므로 재학습은 하지 않겠습니다.
MobileNetV1에 SEBlock을 부착하지 않았을 때의, 정확도는 어떻게 될까요?? 궁금해서 SEBlock을 적용하지 않은 MobileNetV1을 구축하고 동일한 조건에서 100epoch 학습해보았습니다.

SEBlock을 사용하니 정확도가 1% 상승했네요!
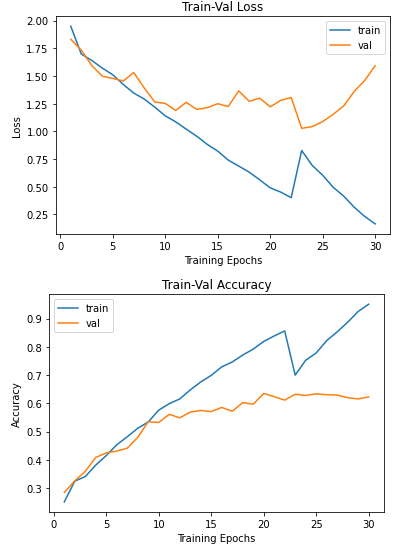
이제, train-val loss progress를 출력하겠습니다.
# train-val progress
num_epochs = params_train['num_epochs']

# plot loss progress
plt.title('Train-Val Loss')
plt.plot(range(1, num_epochs+1), loss_hist['train'], label='train')
plt.plot(range(1, num_epochs+1), loss_hist['val'], label='val')
plt.ylabel('Loss')
plt.xlabel('Training Epochs')
plt.legend()
plt.show()

# plot accuracy progress
plt.title('Train-Val Accuracy')
plt.plot(range(1, num_epochs+1), metric_hist['train'], label='train')
plt.plot(range(1, num_epochs+1), metric_hist['val'], label='val')
plt.ylabel('Accuracy')
plt.xlabel('Training Epochs')
plt.legend()
plt.show()
감사합니다.
'논문 구현' 카테고리의 다른 글
| [논문 구현] PyTorch로 YOLOv3(2018) 구현하고 학습하기 (6) | 2021.04.04 |
|---|---|
| [논문 구현] PyTorch로 EfficientNet(2019) 구현하고 학습하기 (12) | 2021.03.30 |
| [논문 구현] PyTorch로 ResNext(2017) 구현하고 학습하기 (1) | 2021.03.29 |
| [논문 구현] PyTorch로 Residual Attention Network(2017) 구현하고 학습하기 (0) | 2021.03.27 |
| [논문 구현] PyTorch로 MobileNetV1(2017) 구현하고 학습하기 (1) | 2021.03.23 |