반응형
COCO dataset은 용량이 너무 크기 때문에 구글 코랩에서 YOLOv3을 학습시키는데에 무리가 있습니다. 여러번 시도했지만.. 실패했네요ㅎㅎ 그래서 저용량의 VOC2007 dataset을 가져왔습니다!
VOC2007 dataset을 다운로드 받고, 커스텀 데이터셋을 생성하여 바운딩박스 출력값이 (class, cx, cy, w, h)되도록 만들겠습니다.
구글 코랩을 마운트 합니다.
from google.colab import drive
drive.mount('yolov3')
dataset을 다운로드 받고 압축을 풀어줍니다. 다운로드 받을 디렉토리 경로를 잘 설정해줘야 합니다.
!mkdir train
!mkdir test
!wget http://pjreddie.com/media/files/VOCtrainval_06-Nov-2007.tar -P train/
!wget http://pjreddie.com/media/files/VOCtest_06-Nov-2007.tar -P test/
!tar -xf test/VOCtest_06-Nov-2007.tar -C test/
!tar -xf train/VOCtrainval_06-Nov-2007.tar -C train/
!rm -rf test/VOCtest_06-Nov-2007.tar
필요한 라이브러리를 import 합니다. xmltodict 모듈은 xml 파일을 dict로 읽어옵니다.
import xmltodict
import numpy as np
import sys
import os
from torch.utils.data import Dataset
from PIL import Image
import torchvision.transforms.functional as TF
import os
import numpy as np
import torch
다운로드 받은 VOC2007 dataset의 annotation 경로를 설정합니다.
path2annotation = '/content/yolov3/MyDrive/voc_data/{}/VOCdevkit/VOC2007/Annotations'
VOC2007의 카테로리 이름을 classes에 저장합니다.
classes = ['person', # Person
           'bird', 'cat', 'cow', 'dog', 'horse', 'sheep', # Animal
           'aeroplane', 'bicycle', 'boat', 'bus', 'car', 'motorbike', 'train', # Vehicle
           'bottle', 'chair', 'dining table', 'potted plant', 'sofa', 'tv/monitor' # Indoor
           ]
이제 커스텀 데이터셋을 생성하겠습니다. 코드는 여기를 참고했습니다.
device = torch.device('cuda:0' if torch.cuda.is_available() else 'cpu')

class VOC2007Dataset(Dataset):
    def __init__(self, path2annotation, mode='train', transform=None, trans_params=None):
        self.path2annotation = path2annotation.format(mode)
        self.transform = transform
        self.trans_params = trans_params
        self.mode = mode
        self.img_inf = []

        for ann in [os.path.join(self.path2annotation, ann) for ann in os.listdir(self.path2annotation)]:
            f = open(ann)
            info = xmltodict.parse(f.read())['annotation']
            img_id = info['filename']
            img_size = np.asarray(tuple(map(int, info['size'].values()))[:2], np.int16)
            w, h = img_size
            box_objects = info['object']
            labels = []
            bboxs = []
            for obj in box_objects:
                try:
                    labels.append(voc_names.index(obj['name'].lower()))
                    bboxs.append(tuple(map(int, obj['bndbox'].values())))
                except: pass
            # resize box, change x1 y1 x2 y2
            bboxs = np.asarray(bboxs, dtype=np.float64)
            try:
                bboxs[:, [0,2]] /= w
                bboxs[:, [1,3]] /= h
                box_cxy = (bboxs[:, 2:] + bboxs[:, :2]) / 2.0
                box_wh = np.abs(bboxs[:, 2:] - bboxs[:, :2])
                bboxs[:, :2] = box_cxy
                bboxs[:, 2:] = box_wh
            except: pass
            if bboxs.shape[0]:
                self.img_inf.append({'image_id':img_id, 'image_size':image_size, 'bboxs':bboxs, 'labels':labels})

    def __len__(self):
        return len(self.img_inf)

    def __getitem__(self, idx):
        path2inf = self.img_inf[idx]
        img_id = path2inf['image_id']
        bboxs = path2inf['bboxs'].tolist()
        label = path2inf['labels']
        path2img = self.path2annotation.replace('Annotations', 'JPEGImages/{}').format(img_id)

        img = Image.open(path2img.format(img_id)).convert('RGB')
        # img = np.array(img)
        _ = []
        labels = []

        for a, b in zip(label, bboxs):
            _.append(a)
            _.extend(b)
            labels.append(_)
            _ = []
        labels = np.array(labels)

        if self.transform:
            img, labels = self.transform(img, labels, self.trans_params)

        return img, labels, path2img
잘 생성되었는지 확인해보겠습니다.
voc_train = VOC2007Dataset(path2annotation, mode='train')
print(len(voc_train))
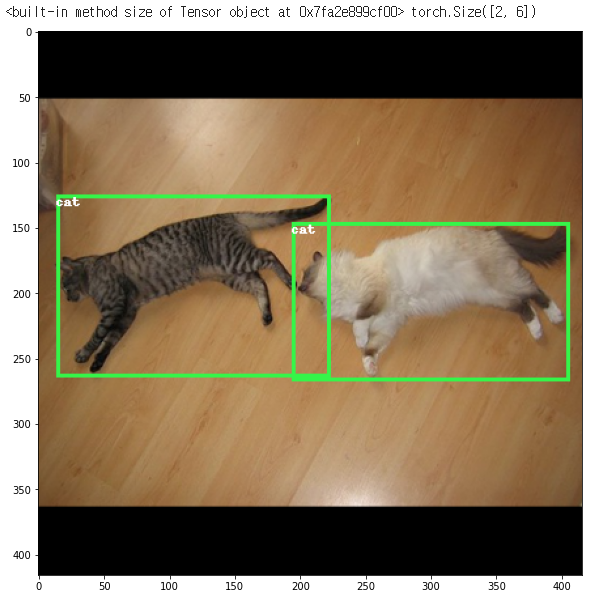
데이터셋에서 이미지를 꺼내 확인해보겠습니다.
# display a sample image from the voc_train dataset
import matplotlib.pyplot as plt
import numpy as np
from PIL import Image, ImageDraw, ImageFont
from torchvision.transforms.functional import to_pil_image
import random
%matplotlib inline

def rescale_bbox(bb, W, H):
    x,y,w,h = bb
    return [x*W, y*H, w*W, h*H]
COLORS = np.random.randint(0, 255, size=(80, 3),dtype="uint8")
def show_img_bbox(img, targets):
    if torch.is_tensor(img):
        img = to_pil_image(img)
    if torch.is_tensor(targets):
        targets = targets.numpy()[:, 1:]

    W, H = img.size
    draw = ImageDraw.Draw(img)

    for tg in targets:
        id_ = int(tg[0])
        bbox = tg[1:]
        bbox = rescale_bbox(bbox, W, H)
        xc, yc, w, h = bbox

        color = [int(c) for c in COLORS[id_]]
        name = voc_names[id_]

        draw.rectangle(((xc-w/2, yc-h/2), (xc+w/2, yc+h/2)),outline=tuple(color),width=3)
        draw.text((xc-w/2, yc-h/2), name, fill=(255,255,255,0))

    plt.imshow(np.array(img))
img, labels, path2img = voc_train[3]
print(img.size, labels.shape)

plt.rcParams['figure.figsize'] = (20, 10)
show_img_bbox(img,labels)

귀여운 고양이가 나타났네요ㅎㅎ
추후에 YOLOv3을 학습시키는 과정까지 포함하여 포스팅해보겠습니다!
반응형
'Python > PyTorch 공부' 카테고리의 다른 글
| [PyTorch] torch.bernoulli 를 활용한 Stochastic depth 학습 (0) | 2021.03.29 |
|---|---|
| [PyTorch] Swish 활성화 함수 정의해서 사용하기 (0) | 2021.03.27 |
| [PyTorch] 러닝 레이트 스케쥴러(Learning Rate Scheduler) ReducedLROnPlateau 함수 (2) | 2021.03.06 |
| [PyTorch] Single Object Detection 모델 생성하기 (1) | 2021.03.06 |
| [PyTorch] 커스텀 데이터셋(custom dataset) 생성하기 (0) | 2021.03.06 |