반응형
파이토치로 data augmentation 함수를 정의해보겠습니다.
transformation.Compose 함수로 정의하면 쉽게 data augmentation을 사용할 수 있지만, 이 경우에 모든 dataset에 적용이 됩니다. custum dataset을 train과 val로 나눈뒤에 각각에 다른 transformation을 적용하기 위해 함수를 정의해서 사용합니다.
이번 포스팅에서 정의할 data augmentation은 resize, horizontally flip, vertically flip, shift, brightness, contrast, gamma, scale label) 입니다.
1. 이미지 resize
이미지를 resize 해줌과 동시에 label도 갱신해줘야 합니다.
import torchvision.transforms.functional as TF
# create a data transformation pipeline for single-object detection

# define a helper function to resize images
def resize_img_label(image, label=(0., 0.), target_size=(256,256)):
    w_orig, h_orig = image.size
    w_target, h_target = target_size
    cx, cy = label
    image_new = TF.resize(image, target_size)
    label_new = cx/w_orig*w_target, cy/h_orig*h_target
    return image_new, label_new

# resize an image
img, label = load_img_label(labels_df, 1)
print(img.size, label)

img_r, label_r = resize_img_label(img, label)
print(img_r.size, label_r)

plt.subplot(1, 2, 1)
show_img_label(img, label, w_h=(150, 150), thickness=20)
plt.subplot(1, 2, 2)
show_img_label(img_r, label_r)

2. horizontally flip
# define a helper function to randomly flip images horizontally
def random_hflip(image, label):
    w, h = image.size
    x, y = label

    image = TF.hflip(image)
    label = w-x, y
    return image, label

img, label = load_img_label(labels_df, 1)

img_r, label_r = resize_img_label(img, label)
img_fh, label_fh = random_hflip(img_r, label_r)

plt.subplot(1,  2, 1)
show_img_label(img_r, label_r)
plt.subplot(1, 2, 2)
show_img_label(img_fh, label_fh)

3. Vertically flip
# define a function to randomly flip images vertically
def random_vflip(image, label):
    w, h = image.size
    x, y = label

    image = TF.vflip(image)
    label = x, w-y
    return image, label

img, label = load_img_label(labels_df, 7)
img_r, label_r = resize_img_label(img, label)
img_fv, label_fv = random_vflip(img_r, label_r)

plt.subplot(1, 2, 1)
show_img_label(img_r, label_r)

plt.subplot(1, 2, 2)
show_img_label(img_fv, label_fv)

4. shift or translate image
# define a helper function to randomly shift or translate images in either direction
import numpy as np
np.random.seed(1)

def random_shift(image, label, max_translate=(0.2, 0.2)):
    w, h = image.size
    max_t_w, max_t_h = max_translate
    cx, cy = label
    trans_coef = np.random.rand() * 2 - 1
    w_t = int(trans_coef * max_t_w * w)
    h_t = int(trans_coef * max_t_h * h)
    image = TF.affine(image, translate=(w_t, h_t), shear=0, angle=0, scale=1)
    label = cx + w_t, cy + h_t
    return image, label

img, label = load_img_label(labels_df, 1)
img_r, label_r = resize_img_label(img, label)
img_t, label_t = random_shift(img_r, label_r, max_translate=(0.5, 0.5))

plt.subplot(1, 2, 1)
show_img_label(img_r, label_r)
plt.subplot(1, 2, 2)
show_img_label(img_t, label_t)

5. scale labels
# scale the labels
def scale_label(a,b):
    div = [ai/bi for ai,bi in zip(a,b)]
    return div
6. adjust_brightness
brightness_factor=1+(np.random.rand()*2-1)*params["brightness_factor"]
image=TF.adjust_brightness(image,brightness_factor)
7. adjust_contrast
contrast_factor=1+(np.random.rand()*2-1)*params["contrast_factor"]
image=TF.adjust_contrast(image,contrast_factor)
8. adhust_gamma
gamma=1+(np.random.rand()*2-1)*params["gamma"]
image=TF.adjust_gamma(image,gamma)
이제 이미지에 transformer를 적용하는 함수를 정의합니다.
def transformer(image, label, params):
    image,label=resize_img_label(image,label,params["target_size"])

    if random.random() < params["p_hflip"]:
        image,label=random_hflip(image,label)

    if random.random() < params["p_vflip"]:
        image,label=random_vflip(image,label)

    if random.random() < params["p_shift"]:
        image,label=random_shift(image,label, params["max_translate"])

    if random.random() < params["p_brightness"]:
        brightness_factor=1+(np.random.rand()*2-1)*params["brightness_factor"]
        image=TF.adjust_brightness(image,brightness_factor)

    if random.random() < params["p_contrast"]:
        contrast_factor=1+(np.random.rand()*2-1)*params["contrast_factor"]
        image=TF.adjust_contrast(image,contrast_factor)

    if random.random() < params["p_gamma"]:
        gamma=1+(np.random.rand()*2-1)*params["gamma"]
        image=TF.adjust_gamma(image,gamma)

    if params["scale_label"]:
        label=scale_label(label,params["target_size"])

    image=TF.to_tensor(image)
    return image, label
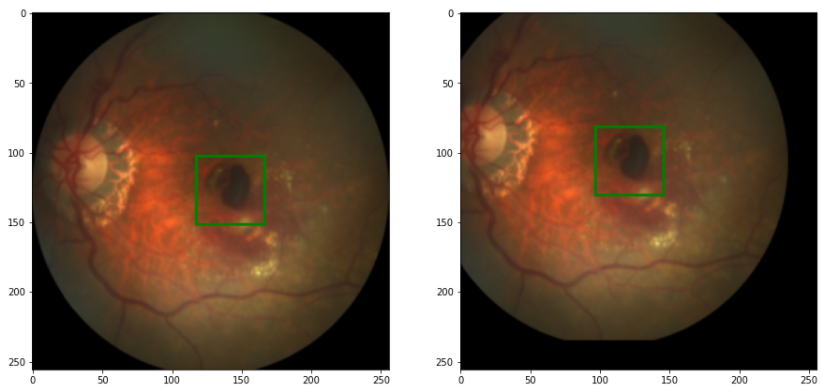
이미지를 불러오고, params를 정의하고, transformation을 적용합니다.
적용된 이미지와 original 이미지를 확인하겠습니다.
np.random.seed(0)
random.seed(0)

# load image and label
img, label=load_img_label(labels_df,1)

params={
    "target_size" : (256, 256),
    "p_hflip" : 1.0,
    "p_vflip" : 1.0,
    "p_shift" : 1.0,
    "max_translate": (0.5, 0.5),
    "p_brightness": 1.0,
    "brightness_factor": 0.8,
    "p_contrast": 1.0,
    "contrast_factor": 0.8,
    "p_gamma": 1.0,
    "gamma": 0.4,
    "scale_label": False,
}
img_t,label_t=transformer(img,label,params)

plt.subplot(1,2,1)
show_img_label(img,label,w_h=(150,150),thickness=20)
plt.subplot(1,2,2)
show_img_label(TF.to_pil_image(img_t),label_t)

반응형
'Python > PyTorch 공부' 카테고리의 다른 글
| [PyTorch] Single Object Detection 모델 생성하기 (1) | 2021.03.06 |
|---|---|
| [PyTorch] 커스텀 데이터셋(custom dataset) 생성하기 (0) | 2021.03.06 |
| [PyTorch] 이미지 크기와 바운딩박스 좌표를 resize 하는 함수 정의 (0) | 2021.03.06 |
| [PyTorch] single object image 분석 (0) | 2021.03.06 |
| [PyTorch] ResNet, pre-trained 모델 불러오기 (0) | 2021.03.01 |