안녕하세요, 이번 포스팅에서는 Style transfer의 시초가 되는 A Neural Algorithm of Artistic Style 논문을 구현하고 이미지 합성을 진행하겠습니다. 작업 환경은 Google Colab에서 진행했습니다.
논문 리뷰는 아래 포스팅에서 확인하실 수 있습니다.
[논문 읽기] PyTorch 구현 코드로 살펴보는 Style Transfer(2015)
안녕하세요, 오늘 읽은 논문은 A Neural Algorithm of Artistic Style 입니다. 해당 논문은 Style Transfer의 시초가 되는 논문이라고 하네요 ㅎㅎ 논문을 읽어도 이해가 잘 되지 않아, 구현코드를 살펴보면서
deep-learning-study.tistory.com
전체 코드는 아래 깃허브에서 확인하실 수 있습니다.
Seonghoon-Yu/Paper_Review_and_Implementation_in_PyTorch
공부 목적으로 논문을 리뷰하고 해당 논문 파이토치 재구현을 합니다. Contribute to Seonghoon-Yu/Paper_Review_and_Implementation_in_PyTorch development by creating an account on GitHub.
github.com
코드 출처는 아래 깃허브입니다.
PacktPublishing/PyTorch-Computer-Vision-Cookbook
PyTorch Computer Vision Cookbook, Published by Packt - PacktPublishing/PyTorch-Computer-Vision-Cookbook
github.com
데이터 불러오기
style transfer을 위한 content image와 style image를 불러옵니다. 저는 아래 이미지를 사용했습니다 ㅎㅎ

데이터를 저장할 폴더를 생성합니다.
# 데이터를 저장할 폴더 생성
!mkdir data
해당 폴더에 image를 업로드 합니다.
cd /content/data# content, style 사진 업로드
from google.colab import files
file_uploaded = files.upload()
두 이미지를 불러옵니다.
# content와 style 이미지 불러오기
from PIL import Image
path2content = '/content/data/content.jpg'
path2style = '/content/data/style.jpg'

content_img = Image.open(path2content)
style_img = Image.open(path2style)
transformation 적용하기
resize, normalize를 적용하겠습니다.
import torchvision.transforms as transforms

h, w = 256, 384
mean_rgb = (0.485, 0.456, 0.406)
std_rgb = (0.229, 0.224, 0.225)

transformer = transforms.Compose([
                transforms.Resize((h,w)),
                transforms.ToTensor(),
                transforms.Normalize(mean_rgb, std_rgb)
])

# 이미지에 transformation 적용하기
content_tensor = transformer(content_img)
style_tensor = transformer(style_img)
print(content_tensor.shape, content_tensor.requires_grad)
print(style_tensor.shape, style_tensor.requires_grad)
transformation이 적용된 image 시각화하기
# transformation이 적용된 image 시각화하기
import torch

def imgtensor2pil(img_tensor):
    img_tensor_c = img_tensor.clone().detach()
    img_tensor_c *= torch.tensor(std_rgb).view(3, 1,1)
    img_tensor_c += torch.tensor(mean_rgb).view(3,1,1)
    img_tensor_c = img_tensor_c.clamp(0,1)
    img_pil = to_pil_image(img_tensor_c)
    return img_pil
import matplotlib.pyplot as plt
%matplotlib inline
from torchvision.transforms.functional import to_pil_image
plt.figure(figsize=(10,10))
plt.subplot(1,2,1)
plt.imshow(imgtensor2pil(content_tensor))
plt.subplot(1,2,2)
plt.imshow(imgtensor2pil(style_tensor))
style transfer 구현하기
pre-trained VGG19를 불러와서, content image와 style image의 특징을 추출합니다.
# pretrained VGG19를 불러옵니다
import torchvision.models as models

device = torch.device('cuda' if torch.cuda.is_available() else 'cpu')
model_vgg = models.vgg19(pretrained=True).features.to(device).eval()

# 파라미터를 freeze 합니다.
for param in model_vgg.parameters():
    param.requires_grad_(False)
손실 함수 정의하기
# style loss와 content loss를 정의하기 위해
# 모델의 중간 feature를 얻은 후 Gram matrix를 계산해야 합니다.

# 모델의 중간 레이어의 출력값을 얻는 함수를 정의합니다.
def get_features(x, model, layers):
    features = {}
    for name, layer in enumerate(model.children()): # 0, conv
        x = layer(x)
        if str(name) in layers:
            features[layers[str(name)]] = x
    return features
gram matrix를 계산하는 함수입니다. style loss를 계산할 때 필요합니다. style loss는 input tensor와 style image의 gram matrix가 동일한 값을 갖는 방향으로 학습을 진행합니다.

# Gram matrix를 계산하는 함수를 정의합니다.
def gram_matrix(x):
    n, c, h, w = x.size()
    x = x.view(n*c, h*w)
    gram = torch.mm(x,x.t()) # 행렬간 곱셈 수행
    return gram
content loss
content feature와 input feature 사이의 MSE를 계산합니다.

# content loss를 계산하는 함수를 정의합니다.
import torch.nn.functional as F

def get_content_loss(pred_features, target_features, layer):
    target = target_features[layer]
    pred = pred_features[layer]
    loss = F.mse_loss(pred, target)
    return loss
style loss
input과 style의 gram matrix가 동일해지도록 학습합니다.


# style loss
def get_style_loss(pred_features, target_features, style_layers_dict):
    loss = 0
    for layer in style_layers_dict:
        pred_fea = pred_features[layer]
        pred_gram = gram_matrix(pred_fea)
        n, c, h, w = pred_fea.shape
        target_gram = gram_matrix(target_features[layer])
        layer_loss = style_layers_dict[layer] * F.mse_loss(pred_gram, target_gram)
        loss += layer_loss / (n*c*h*w)
    return loss
pre-trained VGG19을 사용하여 content와 style image의 feature을 추출합니다.
# content와 style image를 위한 feature를 얻습니다.
feature_layers = {'0': 'conv1_1',
                  '5': 'conv2_1',
                  '10': 'conv3_1',
                  '19': 'conv4_1',
                  '21': 'conv4_2',
                  '28': 'conv5_1'}

con_tensor = content_tensor.unsqueeze(0).to(device)
sty_tensor = style_tensor.unsqueeze(0).to(device)

content_features = get_features(con_tensor, model_vgg, feature_layers)
style_features = get_features(sty_tensor, model_vgg, feature_layers)
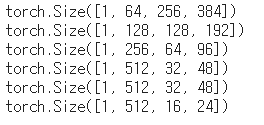
추출한 특징을 확인합니다.
# content feature를 확인합니다.
for key in content_features.keys():
    print(content_features[key].shape)
optimizer 정의하기.
input_tensor은 content image을 복사하여 생성합니다. optimizer은 input_tensor의 pixel value를 갱신합니다. 즉, 학습을 진행할수록 모델의 파라미터가 갱신되는 것이 아니라 input_tensor의 값이 갱신됩니다.
# content tensor을 복사한 input tensor을 생성합니다.
input_tensor = con_tensor.clone().requires_grad_(True)

# optimizer를 정의합니다.
from torch import optim
optimizer = optim.Adam([input_tensor], lr=0.01)
이미지 합성하기
style_layers_dict는 5개의 conv layer에서 출력하는 style image의 특징들에 대한 가중치 정보를 갖고 있습니다.
# 하이퍼파라미터를 정의합니다
num_epochs = 300
content_weight = 1e1
style_weight = 1e4
content_layer = 'conv5_1'
style_layers_dict = {'conv1_1':0.75,
                     'conv2_1':0.5,
                     'conv3_1':0.25,
                     'conv4_1':0.25,
                     'conv5_1':0.25}


# style transfer
for epoch in range(num_epochs+1):
    optimizer.zero_grad()
    input_features = get_features(input_tensor, model_vgg, feature_layers) # feature_layers에 해당하는 layer의 출력값 얻기
    content_loss = get_content_loss(input_features, content_features, content_layer) #
    style_loss = get_style_loss(input_features, style_features, style_layers_dict)
    neural_loss = content_weight * content_loss + style_weight * style_loss
    neural_loss.backward(retain_graph=True)
    optimizer.step()
    if epoch % 100 == 0:
        print('epoch {}, content loss: {:.2}, style loss: {:.2}'.format(epoch, content_loss, style_loss))
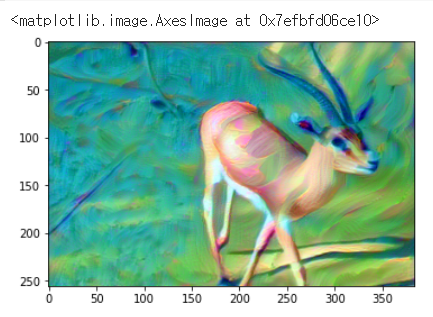
결과를 시각화합니다.
# 결과 시각화
plt.imshow(imgtensor2pil(input_tensor[0].cpu()))
감사합니다.
'논문 구현' 카테고리의 다른 글
| [논문 구현] PyTorch로 SRCNN(2014) 구현하고 학습하기 (3) | 2021.06.15 |
|---|---|
| [논문 구현] PyTorch로 Seq2Seq(2014) 구현하고 학습하기 (0) | 2021.06.15 |
| [논문 구현] PyTorch로 Pix2Pix(2016) 구현하고 학습하기 (5) | 2021.05.20 |
| [논문 구현] PyTorch로 DCGAN(2015) 구현하고 학습하기 (0) | 2021.05.19 |
| [논문 구현] PyTorch로 CGAN(2014) 구현하고 학습하기 (1) | 2021.05.18 |