안녕하세요, 이번 포스팅에서는 SRCNN을 PyTorch로 구현하고 학습까지 진행한 후에 성능까지 test를 해보겠습니다. 작업 환경은 Google Colab에서 진행했습니다.
논문 리뷰는 아래 포스팅에서 확인하실 수 있습니다.
[논문 읽기] PyTorch 코드로 살펴보는 SRCNN(2014), Image Super-Resolution Using Deep Convolutional Networks
안녕하세요, 오늘 읽은 논문은 SRCNN, Image Super-Resolution Using Deep Convolutional Networks 입니다. 해당 논문은 이미지의 해상도를 높이는 task인 super-resolution 분야에 CNN을 최초로 적용한 논문..
deep-learning-study.tistory.com
전체 코드는 아래 깃허브에서 확인하실 수 있습니다.
Seonghoon-Yu/Paper_Review_and_Implementation_in_PyTorch
공부 목적으로 논문을 리뷰하고 해당 논문 파이토치 재구현을 합니다. Contribute to Seonghoon-Yu/Paper_Review_and_Implementation_in_PyTorch development by creating an account on GitHub.
github.com
구현 코드는 아래 홈페이지를 참고했습니다.
- https://github.com/kawaiimaths/pytorch_srcnn
- https://github.com/fuyongXu/SRCNN_Pytorch_1.0
- https://debuggercafe.com/image-super-resolution-using-deep-learning-and-pytorch/
우선, google colab에 mount를 한뒤에, 필요한 라이브러리를 import 합니다.
from google.colab import drive
drive.mount('srcnn')
import torch
import matplotlib
import matplotlib.pyplot as plt
import time
import h5py
import srcnn
import torch.optim as optim
import torch.nn as nn
import numpy as np
import math
from torchvision.transforms import ToPILImage
from torch.utils.data import DataLoader, Dataset
from tqdm import tqdm
from sklearn.model_selection import train_test_split
from torchvision.utils import save_image
%matplotlib inline

import torch.nn as nn
import torch.nn.functional as F
import time

device = torch.device('cuda' if torch.cuda.is_available() else 'cpu')
1. 데이터셋 불러오기
아래 홈페이지에서 데이터셋을 다운로드 받습니다. 그리고 google drive에 저장합니다. 해당 데이터셋은 22000개의 이미지를 갖고 있습니다.
https://drive.google.com/file/d/1aPxBtvIEMWrLt-awM-0Fko8sJONqOpUx/view
# 디렉토리 이동
!cd /content

# 데이터를 저장할 폴더 생성
!mkdir data

# 압축 풀기
!unzip /content/srcnn/MyDrive/data/input.zip -d /content/data
데이터를 변수에 담고, train, val 분할을 합니다.
# 입력 이미지 차원 설정하기
input_h, input_w = 33, 33 # sub-image에 대한 크기
out_h, out_w = 33, 33 # label인 high-resolution에 대한 크기

# sub-images와 label 읽어오기
file = h5py.File('/content/data/train_mscale.h5')
in_train = file['data'][:] # train data
out_train = file['label'][:] # train label
file.close()

# float32로 타입 변경
in_train = in_train.astype('float32')
out_train = out_train.astype('float32')

# 0.75: 0.15 = train : val 분할
(x_train, x_val, y_train, y_val) = train_test_split(in_train, out_train, test_size=0.25)
print(x_train.shape[0])
print(x_val.shape[0])
커스텀 데이터셋을 정의합니다.
# 커스텀 데이터셋 생성하기
class SRCNNDataset(Dataset):
    def __init__(self, image_data, labels):
        self.image_data = image_data
        self.labels = labels

    def __len__(self):
        return (len(self.image_data))

    def __getitem__(self, index):
        image = self.image_data[index]
        label = self.labels[index]
        return (torch.tensor(image, dtype=torch.float),
            torch.tensor(label, dtype=torch.float))
데이터셋과 데이터로더를 생성합니다.
# 데이터셋 생성
train_ds = SRCNNDataset(x_train, y_train)
val_ds = SRCNNDataset(x_val, y_val)

# 데이터로더 생성
train_dl = DataLoader(train_ds, batch_size=64)
val_dl = DataLoader(val_ds, batch_size=64)
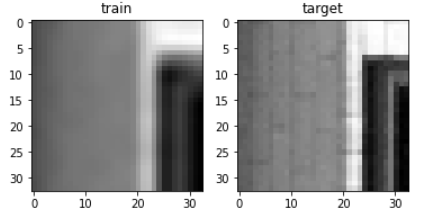
데이터를 check하고 시각화를 합니다.
# 데이터 체크
for x, y in train_dl:
    print(x.shape, y.shape)
    break
from torchvision.transforms.functional import to_pil_image

plt.figure()
plt.subplot(1,2,1)
plt.imshow(to_pil_image(img), cmap='gray')
plt.title('train')
plt.subplot(1,2,2)
plt.imshow(to_pil_image(target), cmap='gray')
plt.title('target')
2. SRCNN 구현하기
SRCNN은 간단한 구조로 이루어져 있습니다.
class SRCNN(nn.Module):
    def __init__(self):
        super().__init__()

        # padding_mode='replicate'는 zero padding이 아닌, 주변 값을 복사해서 padding 합니다.
        self.conv1 = nn.Conv2d(1, 64, 9, padding=2, padding_mode='replicate')
        self.conv2 = nn.Conv2d(64, 32, 1, padding=2, padding_mode='replicate')
        self.conv3 = nn.Conv2d(32, 1, 5, padding=2, padding_mode='replicate')

    def forward(self, x):
        x = F.relu(self.conv1(x))
        x = F.relu(self.conv2(x))
        x = self.conv3(x)

        return x
가중치를 초기화합니다.
# 가중치 초기화
def initialize_weights(model):
    classname = model.__class__.__name__
    if classname.find('Conv') != -1:
        nn.init.normal_(model.weight.data, 0.0, 0.02)

model.apply(initialize_weights);
3. 학습하기
# 손실함수
loss_func = nn.MSELoss()

# optimizer
import torch.optim as optim
optimizer = optim.Adam(model.parameters())
PSNR은 super-resolution의 평가지표입니다.
# PSNR function: 모델의 출력값과 high-resoultion의 유사도를 측정합니다.
# PSNR 값이 클수록 좋습니다.
def psnr(label, outputs, max_val=1.):
    label = label.cpu().detach().numpy()
    outputs = outputs.cpu().detach().numpy()
    img_diff = outputs - label
    rmse = math.sqrt(np.mean((img_diff)**2))
    if rmse == 0: # label과 output이 완전히 일치하는 경우
        return 100
    else:
        psnr = 20 * math.log10(max_val/rmse)
        return psnr
train 함수를 정의합니다.
# train 함수
def train(model, data_dl):
    model.train()
    running_loss = 0.0
    running_psnr = 0.0

    for ba, data in enumerate(data_dl):
        image = data[0].to(device)
        label = data[1].to(device)

        optimizer.zero_grad()
        outputs = model(image)
        loss = loss_func(outputs, label)
        loss.backward()
        optimizer.step()

        running_loss += loss.item()
        batch_psnr = psnr(label, outputs)
        running_psnr += batch_psnr

    final_loss = running_loss / len(data_dl.dataset)
    final_psnr = running_psnr / int(len(train_ds)/data_dl.batch_size)
    return final_loss, final_psnr
val 함수를 정의합니다.
# validation 함수
def validate(model, data_dl, epoch):
    # epoch는 이미지를 저장할때, 이미지의 이름으로 사용됩니다.

    model.eval()
    running_loss = 0.0
    running_psnr = 0.0
    with torch.no_grad():
        for ba, data in enumerate(data_dl):
            image = data[0].to(device)
            label = data[1].to(device)

            outputs = model(image)
            loss = loss_func(outputs, label)

            running_loss += loss.item()
            batch_psnr = psnr(label,outputs)
            running_psnr += batch_psnr

        outputs = outputs.cpu()
        # tensor를 입력받아 이미지 파일로 저장합니다.
        save_image(outputs, f'/content/outputs/{epoch}.png')

    final_loss = running_loss / len(data_dl.dataset)
    final_psnr = running_psnr / int(len(val_ds)/data_dl.batch_size)
    return final_loss, final_psnr
이미지를 저장할 폴더를 생성합니다. val 함수에 매 epoch마다 이미지를 저장하도록 구현했습니다.
# 이미지를 저장할 폴더 생성
!mkdir outputs
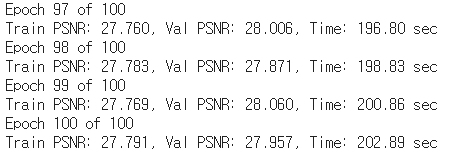
학습을 진행합니다 저는 100epoch 학습하겠습니다.
num_epochs = 100

# 학습하기
train_loss, val_loss = [], []
train_psnr, val_psnr = [], []
start = time.time()
for epoch in range(num_epochs):
    print(f'Epoch {epoch + 1} of {num_epochs}')
    train_epoch_loss, train_epoch_psnr = train(model, train_dl)
    val_epoch_loss, val_epoch_psnr = validate(model, val_dl, epoch)

    train_loss.append(train_epoch_loss)
    train_psnr.append(train_epoch_psnr)
    val_loss.append(val_epoch_loss)
    val_psnr.append(val_epoch_psnr)
    end = time.time()
    print(f'Train PSNR: {train_epoch_psnr:.3f}, Val PSNR: {val_epoch_psnr:.3f}, Time: {end-start:.2f} sec')

history를 출력합니다.
# loss plots
plt.figure(figsize=(10, 7))
plt.plot(train_loss, color='orange', label='train loss')
plt.plot(val_loss, color='red', label='validataion loss')
plt.xlabel('Epochs')
plt.ylabel('Loss')
plt.legend()
plt.show()

# psnr plots
plt.figure(figsize=(10, 7))
plt.plot(train_psnr, color='green', label='train PSNR dB')
plt.plot(val_psnr, color='blue', label='validataion PSNR dB')
plt.xlabel('Epochs')
plt.ylabel('PSNR (dB)')
plt.legend()
plt.show()

4. Test
SRCNN의 해상도 복원 성능을 확인합니다.
# 이미지 꺼내기
for img, label in val_dl:
    img = img[0]
    label = label[0]
    break

# super-resolution
model.eval()
with torch.no_grad():
    img_ = img.unsqueeze(0)
    img_ = img_.to(device)
    output = model(img_)
    output = output.squeeze(0)

# 시각화
plt.figure(figsize=(15,15))
plt.subplot(1,3,1)
plt.imshow(to_pil_image(img))
plt.title('input')
plt.subplot(1,3,2)
plt.imshow(to_pil_image(output))
plt.title('output')
plt.subplot(1,3,3)
plt.imshow(to_pil_image(label))
plt.title('ground_truth')
성능이 엄청 좋진 않네요..ㅎㅎ 감사합니다.
'논문 구현' 카테고리의 다른 글
| [논문 구현] MoCov2(2020) PyTorch 구현 (1) | 2021.07.12 |
|---|---|
| [논문 구현] PyTorch로 Knowledge Distillation(2014) 구현하기 (2) | 2021.06.21 |
| [논문 구현] PyTorch로 Seq2Seq(2014) 구현하고 학습하기 (0) | 2021.06.15 |
| [논문 구현] PyTorch로 Style Transfer(2015)를 구현하고 학습하기 (0) | 2021.06.11 |
| [논문 구현] PyTorch로 Pix2Pix(2016) 구현하고 학습하기 (5) | 2021.05.20 |